BiocManager不能安装包,显示Bioconductor version cannot be validated; no internet connection,不能联网 解决方法

可以使用install.packages安装包,但不能使用BiocManager::install(“”)安装包,显示Bioconductor version cannot be validated; no internet connection , URL ‘https://bioconductor.org/config.yaml’: status was ‘SSL connect error’. 使用BiocManager::valid()也同样出现这样的问题。

尝试了很多方法都无效:

  1. 关闭防火墙,无效;
  2. 更换镜像,无效;
    options("repos" = c(CRAN="https://mirrors.tuna.tsinghua.edu.cn/CRAN/"))
    options(BioC_mirror="https://mirrors.tuna.tsinghua.edu.cn/bioconductor")
  3. 由于我的电脑是win7系统,以为是版本不兼容,从R4.0试到了R4.2.3,无效;
  4. 以为是Rstudio版本的问题,单独在不同版本的R中试,无效;
  5. 设置R里HTTP选项,R里 Tools -> Global Options ->Packages and unchecking the ->”Use Internet Explorer library/proxy for HTTP”option, 也无效;
  6. 设置下载方式,无效;
options(download.file.method = 'libcurl')
options(url.method='libcurl')

后来仔细查看报错信息,可能是无法连接到config.yaml配置文件导致的,在“https://bioconductor.org/config.yaml”中下载了配置文件到自己的电脑,然后指定这个配置文件,果然就搞定了。

options(
  BIOCONDUCTOR_CONFIG_FILE = "D:/Program Files/R/R-4.2.3/config.yaml"
)

Blast Error: mdb_env_open: Function not implemented 错误

最近在使用RepeatMasker时产生这个错误:

Building general libraries in: ~/soft/RepeatMasker/Libraries/CONS-Dfam_withRBRM_3.7/general
RepeatMasker::createLib(): Error invoking ~/soft/rmblast-2.14.0/bin/makeblastdb on file ~/soft/RepeatMasker/Libraries/CONS-Dfam_withRBRM_3.7/general.working/is.lib.

查看makeblastdb.log文件时,发现是BLAST Database creation error: mdb_env_open: Function not implemented,当我单独使用rmblast中的makeblastdb和ncbi-blast+中的makeblastdb时都会发生上述错误,我的blast++版本是2.10.0,但使用blast++ 2.7版本就不会出现上述问题,可能是系统C++版本和blast++编译的C++版本不一致导致的,解决的方法有两种,一种是直接使用低版本的blast++如2.7版本,也可以使用blast++的源代码进行编译安装,可以参考RMBlast 官网的方法,不过时间有点长。

  1. Download NCBI Blast+ and rmblast patch file:
    ncbi-blast-2.14.1+-src.tar.gz
    isb-2.14.1+-rmblast.patch.gz
  2. Install Dependencies:
    You will need a C++ compiler and essential build tools such as make and autotools.
    • Debian and derivatives (Ubuntu, Mint, etc.): apt install build-essential
    • Fedora: yum groupinstall “Development Tools”
    Other missing dependencies might be detected by the configure step later, depending on your operating system.
  3. Unpack Distribution:
    Unpack the distribution in your home directory or in a temporary location ( i.e. /tmp ).
    • cd /mytmp/location/
    • tar zxvf ncbi-blast-2.14.1+-src.tar.gz
    • gunzip isb-2.14.1+-rmblast.patch.gz
  4. Patch:
    • cd ncbi-blast-2.14.1+-src
    • patch -p1 < ../isb-2.14.1+-rmblast.patch
  5. Build:
    To compile the programs for installation in /usr/local/rmblast run:
    • cd ncbi-blast-2.14.1+-src/c++
    • ./configure –with-mt –without-debug –without-krb5 –without-openssl –with-projects=scripts/projects/rmblastn/project.lst –prefix=/usr/local/rmblast
    • make
      • make -j can be used to parallelize the build on multiprocessor systems, e.g. make -j2 to dedicate two cores to the build process.
    • make install
  6. Configure RepeatMasker/RepeatModeler:
    To use the new search engine with RepeatMasker or RepeatModeler, run/re-run the configure program in the RepeatMasker directory and the configure program in the RepeatModeler directory.

samtools faidx 索引文件.fai详解

samtools faidx 能够对fasta 序列建立一个后缀为.fai 的文件,根据这个.fai 文件和原始的fastsa文件, 能够快速的提取任意区域的序列。

例如:

samtools faidx test.fa
samtools faidx test.fa chr1:200-400

那么faidx生成的.fai文件其实为一个文本文件,可以直接打开,通常包括5列,每列内容为:


NAME	Name of this reference sequence
LENGTH	Total length of this reference sequence, in bases
OFFSET	Offset in the FASTA/FASTQ file of this sequence's first base
LINEBASES	The number of bases on each line
LINEWIDTH	The number of bytes in each line, including the newline
QUALOFFSET	Offset of sequence's first quality within the FASTQ file

第一列 NAME : 序列的名称,只保留“>”后,第一个空白之前的内容;

第二列 LENGTH: 序列的长度, 单位为bp;

第三列 OFFSET : 第一个碱基的偏移量, 从0开始计数,换行符也统计进行;

第四列 LINEBASES : 除了最后一行外, 其他代表序列的行的碱基数, 单位为bp;

第五列 LINEWIDTH : 行宽, 除了最后一行外, 其他代表序列的行的长度, 包括换行符, 在windows系统中换行符为\r\n, 要在序列长度的基础上加2;

PAF格式和SAM格式详解

1、PAF格式

paf格式为minimap2默认输出格式,结果至少包括12列:

ColTypeDescription
1stringQuery序列ID
2intQuery序列长度
3intQuery比对开始位置(*based)
4intQuery比对结束位置(*based)
5char如果query/target是正链关系,’+’表示;负链关系,’-‘表示
6stringTarget序列ID
7intTarget序列长度
8intTarget比对开始位置
9intTarget结束开始位置
10int比对上的碱基数 (matching bases)
11int对齐区域长度(包括gaps)
12int比对质量(0-255)

标签说明:

TagTypeDescription
tpAaln类型:P/primary, S/secondary and I,i/inversion
cmiNumber of minimizers on the chain
s1iChaining score
s2iChaining score of the best secondary chain
NMiTotal number of mismatches and gaps in the alignment
MDZTo generate the ref sequence in the alignment
ASiDP alignment score
SAZList of other supplementary alignments
msiDP score of the max scoring segment in the alignment
nniNumber of ambiguous bases in the alignment
tsATranscript strand (splice mode only)
cgZCIGAR string (only in PAF)
csZDifference string
dvfApproximate per-base sequence divergence
defGap-compressed per-base sequence divergence
rliLength of query regions harboring repetitive seeds

2、SAM格式

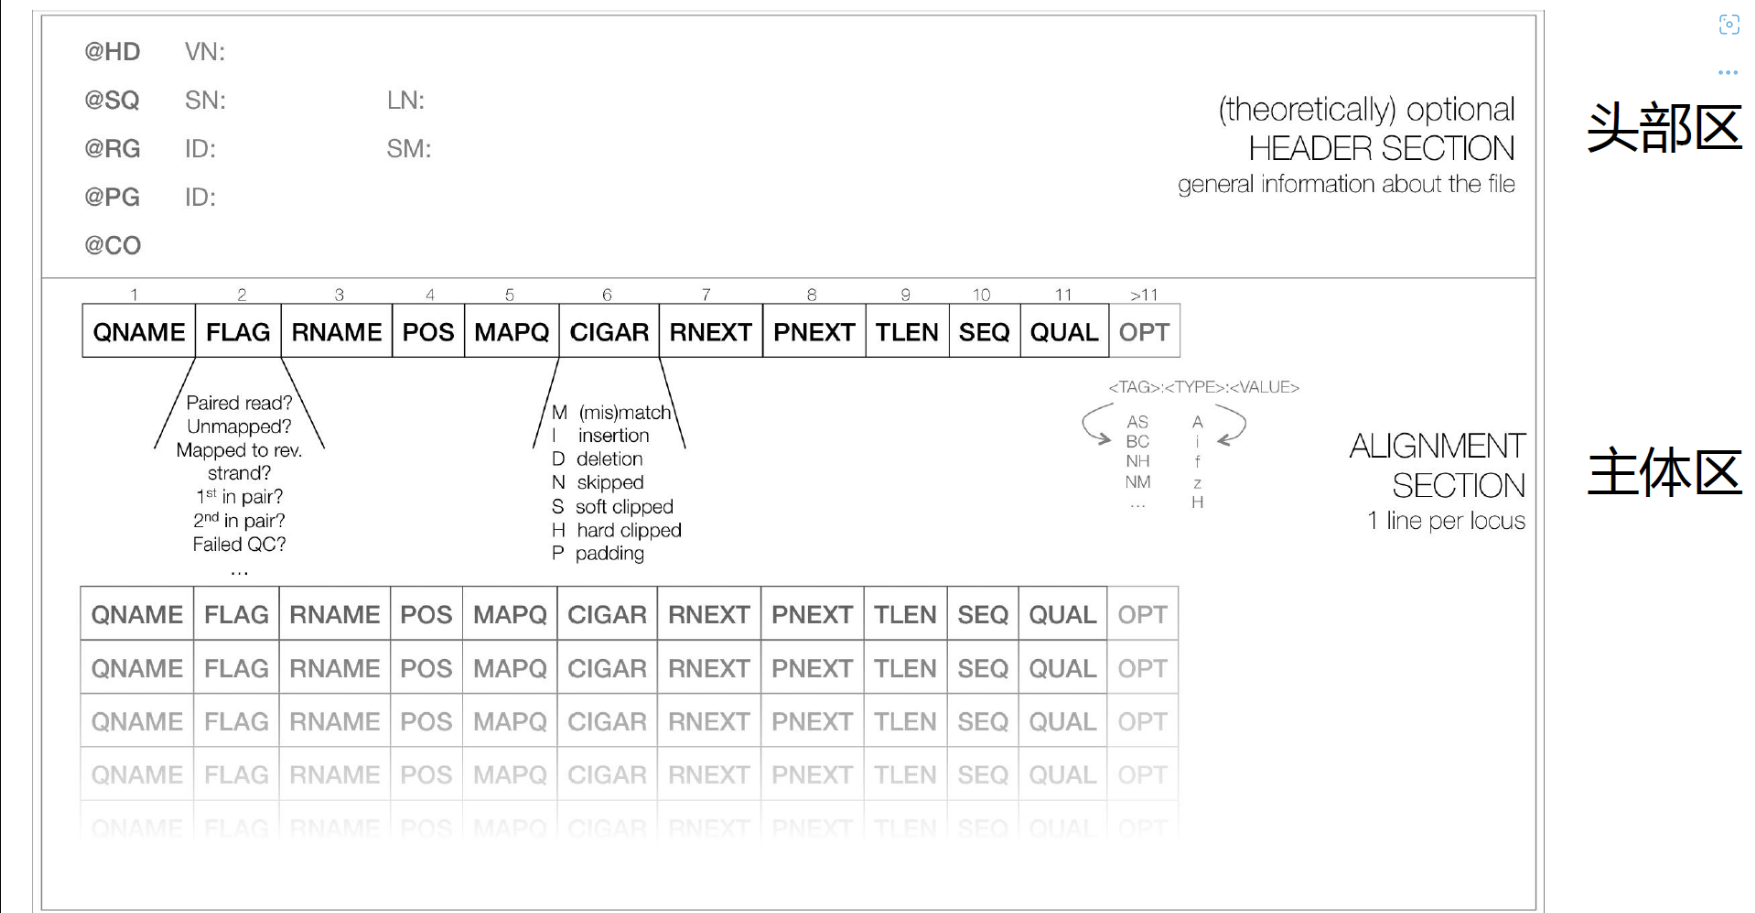
SAM文件由两部分组成,头部区和主体区,都以tab分列。

image.png

1. 头部区:以’@’开始,体现了比对的一些总体信息。比如比对的SAM格式版本,比对的参考序列,比对使用的软件等。

2. 主体区:比对结果,每一个比对结果是一行,有11个主列和一个可选列。

主体区部分:

关键字描述
1QNAMEQuery序列ID
2FLAGBwise FLAG(表示比对类型:paring,strand,mate strand等),如:0,99,256,2048等
3RENAMETarget序列ID
4POS比对到参考序列上的位置,从1开始计数;未比对上为0
5MAPQ比对的质量分数(越高说明比对到参考序列的上的位置越准确)。如果是255,说明该比对值无效。
6CIGAR简要比对信息表达式
7MRNM下一片段比对上的参考序列编号
8MPOS下一片段比对上的位置,如果不可用,此处为0
9ISIZE插入片段长度
10SEQ和参考序列在同一个链上比对的序列(若比对结果在负义链上,则序列是其反向重复序列,反向互补序列)
11QUAL比对序列的质量(ASCII-33=Phred base quality)reads碱基质量值
12Optional Fields可选的列以TAG:TYPE:VALUE的形式提供额外的信息

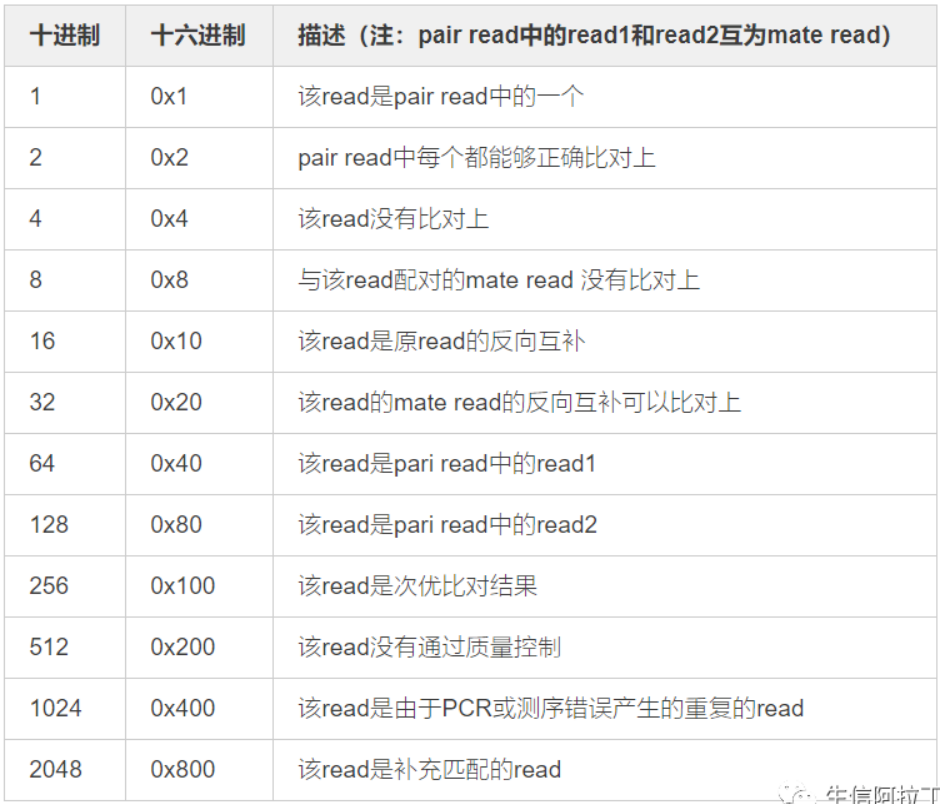
1. FLAG释义表如下

image.png

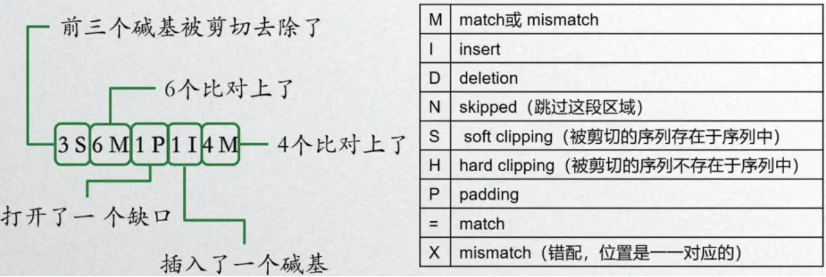
2.   CIGAR string,简要比对信息表达式,示例如下图

image.png

部分内容转自:https://blog.sciencenet.cn/blog-994715-1341509.html

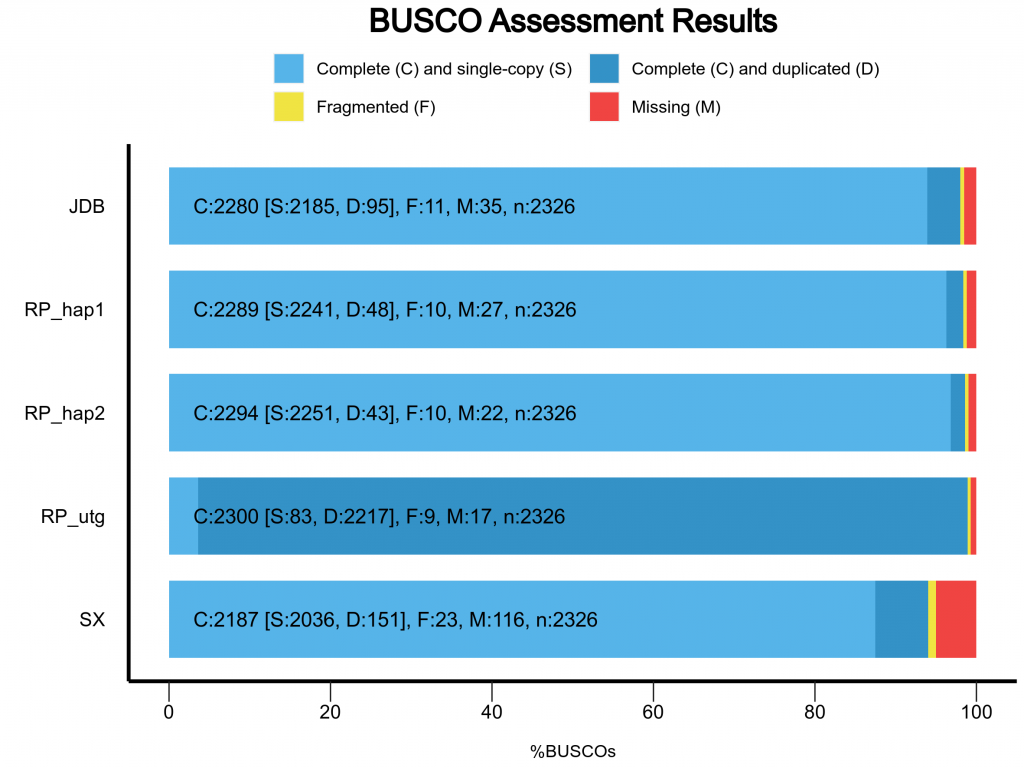
BUSCO结果画图

1、新建一个文件夹,将BUSCO的结果文件拷贝到的这个文件夹中,注意最好不要修改文件名称,如果修改,只改“short_summary.specific.eudicots_odb10.yourname.txt”中的”yourname”部分,且其中不要出现”.”,否则识别不出来,出现“No files matching the pattern short_summary.[generic|specific]* were found in result/” 这种错误。

mkdur -p plot/result
cd plot
cp ../JDB/short_summary.specific.eudicots_odb10.JDB.txt result/
cp ../SX/short_summary.specific.eudicots_odb10.SX.txt result/
cp ../RP_draf.asm_HiC/short_summary.specific.eudicots_odb10.RP_draf.asm_HiC.txt result/short_summary.specific.eudicots_odb10.RP_draf.txt
cp ../RP_draf.asm.hic.hap1/short_summary.specific.eudicots_odb10.RP_draf.asm.hic.hap1.txt result/short_summary.specific.eudicots_odb10.RP_hap1.txt
cp ../RP_draf.asm.hic.hap2/short_summary.specific.eudicots_odb10.RP_draf.asm.hic.hap2.txt result/short_summary.specific.eudicots_odb10.RP_hap2.txt

2、运行generate_plot.py 程序生成图,如果是用conda安装的busco,可以先激活busco,或者用其绝对路径“~/anaconda3/envs/busco/bin/generate_plot.py”

conda activate busco
generate_plot.py -wd result

CentOS安装python2.7虚拟环境

我的CentOS系统中安装有python2.7,python3.8, python3.9,python3.10多个python版本,现在一个软件安装过程需要使用python2.7,但又不想改变默认python版本,就想着安装一个python虚拟环境。

  1. 安装virtualenv
pip install virtualenv

2. 安装python2.7虚拟环境

 mkdir ~/soft/python2.7 && cd ~/soft/python2.7
virtualenv --python=/usr/bin/python2.7 python27

3. 运行python2.7虚拟环境

source ./python27/bin/activate

4. 退出python2.7虚拟环境

deactivate

libc.so.6被误删的恢复

说出来都是泪,国庆都都这个事耽搁了,libc.so.6文件被我不小心删掉了,踩了所有能踩到的坑,终于恢复了。

事情的起因是由于需要做进化树,出来可能树比较大,所以下载了命令行版的MEGA11(mega-cc-11.0.13-1.x86_64),但在安装过程中显示需要glibc2.34, 我用yum最多只能更新到glibc2.28,而是下载了glibc2.34源代码进行编译安装,安装在了/usr/local文件夹中,但系统默认的还是/lib64/中的glibc2.28,于是想着像其它软件一样,先把现在使用的libc.so.6删掉,然后重新建立一个软连接到/usr/local/glicb2.34中的libc.so.6,但当我删除掉/lib64中的libc.so.6后,一切都变了,除了cd命令,其它命令都用不了,除了当前运行的用户,其它用户远程连接也进去不了,想着第二天去机房登录root再改过来不就行了,便第二天去机房发现root用户也登录不了,这时windows思维来了,重启可以解决80%的问题,果断重启了,这也使我失去了最后一次挽救的机会,重启之后,原来的连接也断了,没办法,只能到处找攻略,发现手贱的不只我一个,于是按照攻略开启了曲折的营救模式。

由于服务器安装的是CentOS8,但CentOS8官方已不支持了,官网上下不到系统,我想CentOS7应该也可以,于是就下载了一个CentOS7系统制作启动盘,这就开启了踩坑之旅。

首先出现的是问题是进入救援模式后出现:

No Caching mode page found
Assuming drive cache:write through

2. 修改U盘位置

出现此种情况之后,安装无法进行下去,只能重启,通过搜索发现是由于系统没有识别引导路径,在进入到启动盘界面时,用上下键选择救援模式,然后按”e”进入编辑模式,将hd:后的内容换成U盘所在的盘符位置,如:

vmlinuz initrd=initrd.img inst.stage2=hd:LABEL=CentOSx207x20x86_64 rescue quiet
###修改为
vmlinuz initrd=initrd.img inst.stage2=hd:/dev/sdc4:/ rescue quiet
###如果不知道U盘的位置,可以退出后进入shell模式,然后使用:
ls /dev/sd*
##或者使用查看
fdisk -l

这一步没有问题后按”ctrl+x”运行,看见有选择界面后选择“ 1 continue”,可以运行了,但一直是出现一排排的等于号,我以为可能是由于服务器中文件比较多,加载时间比较长,但等我第二天过来一看还是如此,第三天也一样,我看到别人的只有两排等于号,第四天终于受不了,给终止了,重新找原因。

多年的经验告诉我,百娘在关键时候是不行的,解决问题的最佳途径是要找官方的说明文档,中文中论坛中的解释很多都是很片面的,而是找到了官方的关于救援模式的说明文件,里面详细说明了救援模式的来龙去脉,而且告诉了具体的操作方法,发现救援模式是用Anaconda做的一个小的linux环境,使用Alt+Tab可以切换到命令模式,可以运行

systemctl --no-wall rescue

重新进入救援模式,发现还是出现原来的情况,但是如果选择2 “Read-only mount”的话可以挂载文件,这下心里就有底了,实在弄不了可以选择这个把数据拷贝出来。

3. 更换系统盘

后来想了一下,会不会是由于我的系统是CentOS8,而我使用的救援模式所采用的系统是CentOS7,导致挂载失败,于是重新找了个CentOS8系统,由于官方不支持CentOS8了,很多镜像也去掉这个版本了,幸好阿里云镜像中还有,使用UltraISO做了个新的启动盘,由于U盘比较旧了,插在服务器上接触不良,老是识别不了,没办法重新找了一个好一点的金士顿的盘才做好,但是每次开机时都是直接进入了系统,没有先启动U盘,一开始时我不是已经设置了U盘先启动的吗,使我进一步怀疑是不是U盘有问题,插到其它的电脑试了都没有问题后,重新打开BIOS设置看下是不是U盘先启动,但发现启动顺序恢复到了默认设置,按F2重新设置启动顺序,终于顺利进入了U盘的救援模式,按照上面的操作按”e”进入编辑模式,将hd:后的内容换成U盘所在的盘符位置,进入到系统救援模式,按”1) Continue”,但又遇到了新的问题,就是找不到可用的 linux 系统,明明刚才用CentOS7启动盘的时候可以找到系统吗。而是又搜索了这个错误信息,终于找到了解决的办法。

4. 激活引导分区

出现的错误信息如下:

you don't have any Linux partitions,
Press return to get a shell.
The system will reboot automatically when you exit from the shell.

参考这篇文章介绍的方法终于解决了。运行”fdisk -l”查看分区情况,看到/dev/sda1 后面加了个“*”号,这个可能就是引导分区了,运行”lvdisplay”查看逻辑卷,找到需要激活的逻辑卷,使用vgchange命令进行激活,但当我使用mount挂载时还是找不到,运行”systemctl –no-wall rescue”重新进入救援模式,按”1) Continue”没有出现找不到linux系统,激活的引导程序所在的系统找到了,不到1分钟swap中的内容就挂载上去,因为不需要修改/root和/home中的内容,所以选择不挂载这两个盘。这一步需要运行的命令如下:

###查看磁盘分区情况
fdisk -l
###查看逻辑卷
lvdisplay
###激活逻辑卷
vgchange -ay /dev/cl   ##cl是上一步需要激活的"VG name"
###重新进入救援模式
systemctl --no-wall rescue

5. 恢复libc.so.6文件

与CentOS7不同的是CentOS8默认挂载的文件夹是”/mnt/sysroot/”,不是”/mnt/sysimage”, “chroot /mnt/sysroot”进入到服务器的系统目录(注意不是启动盘中的系统目录),运行”ls‘可以看到系统目录中的文件,进入libc.so.6文件原来的目录”lib64″,拷贝一个libc.so.6文件到这个文件夹中就可以了。

###进入系统目录
chroot /mnt/sysroot
###拷贝文件
cp lib64/libc-2.28.so /lib/libc.so.6     ##因为原来libc.so.6只是libc-2.28.so的软连接,所以直接复制原文件过来就可以了
###重启系统
reboot 

由于系统软件有更改,重启时需要进行安全校验,可能进入系统会花费较长时间,可以更改启动文件来进行设置不检验,启动后再更过来,但是不建议这么做,因为服务器一般启动了很久才会关,有可能有搞忘了改,反正几天时间都花了,多等几分钟也没关系。

参考资料:

https://docs.centos.org/en-US/centos/install-guide/Rescue_Mode/         ###官方资料
https://www.thegeekdiary.com/how-to-boot-into-rescue-mode-or-emergency-mode-through-systemd-in-centos-rhel-7-and-8/                     ###多种进入救援模式的方法
https://www.tecmint.com/recover-or-rescue-corrupted-grub-boot-loader-in-centos-7/   ###CentOS7的救援模式
https://zhuanlan.zhihu.com/p/398478111   ###国内比较详细的介绍救援模式的方法
https://www.golinuxcloud.com/e2fsck-repair-filesystem-in-rescue-mode-ext4/ ###找不到linux系统搜到的解决方法
https://blog.csdn.net/leenhem/article/details/118111370   ###救援模式挂载lvm出错的解决方法

Augustus安装

Augustus作为基因预测必备软件,其源代码安装过程是迄今为止碰到的最难安装的软件,没有之一,现在终于勉强安好了(花了三天)。

  1. 下载最新的augustus版本并解压
wget -c https://github.com/Gaius-Augustus/Augustus/releases/download/v3.4.0/augustus-3.4.0.tar.gz
tar xzvf augustus-3.4.0.tar.gz
cd augustus-3.4.0/

2. 按照README.md的说明安装依赖包,如果是centos系统,安装对应的软件

## Install dependencies

The following dependencies are required for AUGUSTUS:
- For gzip compressed input:
 (set ZIPINPUT = false in [common.mk](common.mk) if this feature is not required or the required libraries are not available)
  - libboost-iostreams-dev
  - zlib1g-dev
- For [comparative AUGUSTUS](docs/README-cgp.md) (multi-species, CGP):
  (set COMPGENEPRED = false in [common.mk](common.mk) if the libraries required by the CGP version are not available. Augustus can then only be run in single-genome mode, which is what most users need.)
  - libgsl-dev
  - libboost-all-dev
  - libsuitesparse-dev
  - liblpsolve55-dev
  - libsqlite3-dev (add SQLITE = false to [common.mk](common.mk) if this feature is not required or the required library is not available)
  - libmysql++-dev (add MYSQL = false to [common.mk](common.mk) if this feature is not required or the required library is not available)
- For compiling bam2hints and filterBam:
  - libbamtools-dev
- For compiling utrrnaseq:
  - libboost-all-dev (version must be >Boost_1_49_0)
- For compiling bam2wig:
  - Follow [these instructions](./auxprogs/bam2wig/README.md). Note that it shouldn't be a problem to compile AUGUSTUS without bam2wig. In practice, you can simply use `bamToWig.py` to accomplish the same task.
- For compiling homgenemapping
  (set BOOST = FALSE in [./auxprogs/homgenemapping/src/Makefile](./auxprogs/homgenemapping/src/Makefile) if the option --printHomologs is not required or the required libraries are not available)
  - libboost-all-dev

3. 由于后面make时一直显示错误“ /usr/bin/ld: cannot find -lmysqlclient ”,尽管mysql和mysql++已经安装好,只能选择“add MYSQL = false to common.mk”了,然后在common.mk文件后面增加suitesparse和htslib库文件的地址,如果不知道库文件的地址在哪里,可以用find或者locate 命令查找suitesparse和htslib。

MYSQL = false
INCLUDE_PATH_SUITESPARSE := -I/usr/include/suitesparse
LIBRARY_PATH_SUITESPARSE := -L/usr/lib64 -Wl,-rpath,/usr/lib64

INCLUDE_PATH_HTSLIB   := -I/usr/local/include/htslib
LIBRARY_PATH_HTSLIB   := -L/usr/local/lib -Wl,-rpath,/usr/local/lib

4. 如果是Centos系统bamtools需要手动安装,其中还需要先安装jsoncpp,bamtools可以安装在当前用户目录,如我的是安装在“~/local/bamtools”这个目录,记住这个路径,后面还要用到。

wget https://github.com/pezmaster31/bamtools/archive/refs/tags/v2.5.2.tar.gz
tar xzvf bamtools-2.5.2.tar.gz
cd bamtools-2.5.2/
yum install jsoncpp-devel.x86_64   #########BamTools also makes use of JsonCpp for certain serialization tasks.
mkdir build
cd build/
mkdir ~/local/bamtools
cmake -DCMAKE_INSTALL_PREFIX=~/local/bamtools ..
make && make install

修改augustus-3.4.0/auxprogs/bam2hints和
augustus-3.4.0/ auxprogs/filterBam/src下的Makefile文件,指明bamtools库文件所在位置。

Now bamtools should have been correctly installed. Next, we need to modify the Makefiles of bam2hints and filterBam to adapt them with our manually installed bamtools.

First, go to the “augustus-3.4.0/auxprogs/bam2hints” directory and make the following changes for the Makefile:

Add:
   BAMTOOLS = ~/local/bamtools

Replace:
   INCLUDES = /usr/include/bamtools
By:
   INCLUDES = $(BAMTOOLS)/include/bamtools

Replace:
   LIBS = -lbamtools -lz
By:
   LIBS = $(BAMTOOLS)/lib64/libbamtools.a -lz

Then, go to the “augustus-3.4.0/auxprogs/filterBam/src” directory and make the following changes for the Makefile:

Replace:
BAMTOOLS = /usr/include/bamtools
By:
BAMTOOLS = ~/local/bamtools

Replace:
INCLUDES = -I$(BAMTOOLS) -Iheaders -I./bamtools
By:
INCLUDES = -I$(BAMTOOLS)/include/bamtools -Iheaders -I./bamtools

Replace:
LIBS = -lbamtools -lz
By:
LIBS = $(BAMTOOLS)/lib64/libbamtools.a -lz

Now, we are finally ready to compile Augustus. Get back to the “augustus-3.4.0” directory and type “make BAMTOOLS=~/local/bamtools”, viola!
make BAMTOOLS=~/local/bamtools

如果出现“bam2wig.c:12:10: fatal error: bgzf.h: No such file or directory” 和 “bam2wig.c:18:17: fatal error: sam.h: No such file or directory”, 使用find或者locate命令查找“bgzf.h” 和 “sam.h” 的位置,然后在 “auxprogs/bam2wig/bam2wig.c”文件中修改这两个文件的位置, 例如:

#include "/usr/local/include/htslib/bgzf.h"
#include "/usr/local/include/htslib/sam.h"

重新运行:

make BAMTOOLS=~/local/bamtools

如果没有再产生错误,恭喜,已经成功安装好了,如果方便后面的使用,可以将需要用到的代码加入环境变量。

export PATH=$PATH:~/soft/augustus-3.4.0/bin:~/soft/augustus-3.4.0/scripts

试着运行一下,查找有没有合适的参考物种:

augustus --species=help

如果有其它错误,可以参考这篇博文

mysql++安装

MySQL++是基于 C++的 对MySQL和MariaDB的再次封装, 它建立在与标准c++库相同的原则之上,使处理数据库如同处理std容器(STL)一样简单。MySQL++还提供了一些工具,可以让您在自己的代码中避免重复的SQL,为这些常见任务提供了本地c++接口。 因此首先需要先安装mysql.

yum install mysql-devel

如果没有root权限,也可以下载源代码包安装。下载mysql++并编译安装:

wget https://tangentsoft.com/mysqlpp/releases/mysql++-3.3.0.tar.gz
 tar xzvf mysql++-3.3.0.tar.gz
 cd mysql++-3.3.0/
 ./configure --prefix=/home/usr/local/installdir --with-mysql=/usr/bin --with-mysql-lib=/usr/lib64/mysql --with-mysql-include=/usr/include/mysql 

make
make install

如果没有管理员权限的话可以安装在用户自己的目录下,通过设置“–prefix=/home/usr/local/installdir”目录,如果配置时出现”
configure: error: The MySQL library cannot be found. “找不到MySQL库,但是mysql已经安装了,那是因为配置程序在固定位置找不到所需要库,可以手动指定mysql库所在位置,如果是用yum安装的可以使用“–with-mysql-lib=/usr/lib64/mysql –with-mysql-include=/usr/include/mysql”指定mysql及库所有的位置,如果不是yum安装的,自己也不知道安装在哪里,可以使用“whereis mysql”查找mysql安装的位置,然后更改为其位置。

由于默认多线程是不开启的,如果需要开启,配置时添加–enable-thread-check这个参数,但是会显示”Didn’t find mysqlclient_r library in “这个错误,找不半天还是没有解决这个错误,最后还是去掉这个参数,舍弃多线程。

如果其它程序需要调用mysql++,但却显示找不到mysql++库,可以运行下面程序:

echo "/usr/local/lib64" > /etc/ld.so.conf
ldconfig
ln -s /usr/local/lib/libmysqlpp.so /usr/lib/libmysqlpp.so 

如果是安装在用户自己的目录下,把“/usr/local/lib64″更改成安装目录的库文件夹,libmysqlpp.so的位置也做相应的修改。

Error loading shared libraries libcrypto.so.1.1

openssh文件损坏,导致连不上网,也运行不了远程连接。连网时出现“Error loading shared libraries libcrypto.so.1.1”,“error while loading shared libraries: libcrypto.so.1.1: cannot open shared object file: No such file or directory”,因为OpenSSL库默认存储在/usr/lib64下,该目录也将包含在搜索路径中。如果OpenSSL是从源代码编译的,那么共享库将安装在/usr/local/lib64下(如果在配置OpenSSL时未使用前缀选项)。这意味着,新安装的库不在搜索路径中,这就是此错误的原因。所以我们需要做的就是,使用下面的命令在搜索路径中包含OpenSSL库。

echo "/usr/local/lib64" > /etc/ld.so.conf.d/openssl.conf
ldconfig